There’s nothing quite like that first bite of a perfectly cooked gyoza—the crispy, golden-brown bottom giving way to a tender, steamed wrapper and a savory, juicy filling. It’s the appetizer we all reach for, the one that disappears from the plate in minutes. If you’ve ever sat in one of our ramen shops wishing you could recreate that experience at home, you’re in the right place. We’re pulling back the curtain to show you exactly how to make restaurant-quality chicken gyoza in your own kitchen. This step-by-step guide covers everything, from choosing the right ingredients to mastering the pan-fry and steam technique, so you can satisfy that craving whenever it strikes.
Key Takeaways
- Prep Your Filling Correctly: To avoid a watery filling and ensure a crispy bottom, always salt your chopped cabbage and squeeze out all the excess moisture before mixing it with the other ingredients.
- Use the Two-Step Cooking Method: The key to that perfect restaurant texture is a combination of frying and steaming. Sear the bottoms in an oiled pan until golden, then add a bit of water and cover to steam the rest of the dumpling until cooked through.
- Fold Now, Eat Later: Gyoza freeze beautifully, making them a perfect make-ahead meal. Flash-freeze freshly folded dumplings on a baking sheet before transferring them to a freezer bag, then cook them straight from frozen whenever you need a quick dinner.
What Exactly Are Chicken Gyoza?
If you’ve ever sat down for a bowl of ramen, you’ve likely seen these perfect little pockets of deliciousness on the menu. Japanese chicken gyoza are crescent-shaped dumplings, typically filled with a savory mix of ground chicken and finely chopped vegetables like cabbage and scallions. They’re served as an appetizer, often alongside a tangy dipping sauce that cuts through the richness of the filling.
What makes them so irresistible is the texture. One side is pan-fried to a crispy, golden-brown finish, while the rest of the delicate wrapper is steamed until tender. This combination of a crunchy bottom and a soft, juicy top makes every bite incredibly satisfying. They’re the perfect starter to get your taste buds ready for a hearty bowl of ramen, which is why you’ll find our own mouth-watering chicken gyoza on the menu at every Otaku location.
A Quick History of Gyoza
Gyoza have a fascinating backstory that starts not in Japan, but in China. The original dish, called jiaozi, has been a staple in Chinese cuisine for centuries. Gyoza made their way to Japan during the 20th century, brought back by Japanese soldiers who had been stationed in northern China, a region famous for its dumplings.
After returning home, they recreated the dish they had grown to love, adapting the recipe to suit Japanese tastes. This new version, with its thinner wrapper and more subtle garlic flavor, quickly became a national favorite. The history of gyoza is a wonderful example of how food travels and transforms, picking up new character in every culture it touches.
Gyoza vs. Other Dumplings: What's the Difference?
So, what makes a gyoza a gyoza, and not just any other dumpling? The main difference lies in the cooking method. While many Chinese dumplings are boiled or fully steamed, gyoza are famous for their pan-fried and steamed technique. This gives them that signature crispy bottom and soft, pleated top.
Gyoza wrappers are also typically thinner than those used for many Chinese dumplings, which allows the filling to be the star of the show. The filling itself is often more finely textured and seasoned with a delicate touch of garlic. Think of gyoza as the Japanese cousin to the Chinese jiaozi—related, but with its own distinct and delicious personality.
Your Chicken Gyoza Shopping List
Getting your ingredients together is the first step toward gyoza greatness. The good news is that you don’t need anything too obscure. A quick trip to your local grocery store or an Asian market should cover it. Think of this list as your roadmap to creating those perfect, crispy-bottomed dumplings you love.
For the Juicy Chicken Filling
The heart of any good gyoza is a flavorful, moist filling. The key is to balance the savory chicken with fresh vegetables and aromatics. You’re not just making a meatball; you’re creating a delicate, textured bite that sings with flavor.
Here’s what you’ll need to grab:
- Ground Chicken: The star of the show.
- Veggies: Finely minced cabbage and chopped scallions (or green onions) add moisture and a subtle sweetness.
- Aromatics: Freshly minced garlic and grated ginger are non-negotiable. They provide that warm, zesty kick that defines gyoza.
- Seasonings: A splash of soy sauce for umami, a drizzle of sesame oil for nutty aroma, and a pinch of salt and pepper to tie it all together.
How to Choose the Best Gyoza Wrappers
Gyoza wrappers are the thin, round skins made from wheat flour and water that hold your delicious filling. You can usually find them in the refrigerated or freezer section of most supermarkets. While you can certainly make your own, store-bought wrappers are a fantastic time-saver and deliver excellent results.
If you can’t find wrappers labeled "gyoza," don't worry. Wonton wrappers are a great substitute. Since they’re often square, you can use kitchen shears or a round cookie cutter to trim them into circles. Just be sure to keep your stack of wrappers covered with a damp cloth while you work so they don’t dry out.
Essential Pantry Staples
Beyond the filling and wrappers, you’ll need a few key items for cooking and serving. These are likely things you already have in your pantry. For the dipping sauce, simplicity is best. A classic soy-vinegar dip lets the gyoza’s flavor shine. At Otaku Ramen, we know a great sauce completes the dish.
Here are the essentials:
For Cooking: A neutral oil with a high smoke point (like canola or vegetable oil) for pan-frying.
For the Dipping Sauce:
- Soy sauce
- Unseasoned rice vinegar
- Japanese chili oil (La-yu), for a little heat (optional, but highly recommended!)
You can mix these to your personal taste, giving everyone their own perfect dipping sauce.
How to Make Chicken Gyoza: A Step-by-Step Guide
Making gyoza from scratch might seem like a project, but it’s one of the most satisfying kitchen tasks you can tackle. There’s something incredibly relaxing about the rhythm of filling and folding each little dumpling. Plus, the payoff is a platter of perfectly crispy, juicy gyoza that tastes even better than takeout because you made it yourself. Think of it as a fun, delicious puzzle. Once you master the basic steps, you can get creative with fillings and dipping sauces. Ready to roll up your sleeves? Let's walk through the process together, one step at a time. You’ll be a gyoza-making pro before you know it.
Step 1: Prepare the Filling
The heart of any great gyoza is a flavorful, juicy filling. The key is to balance the savory chicken with fresh, crisp vegetables and aromatics. A classic chicken gyoza filling combines ground chicken with finely minced cabbage and scallions. To give it that signature flavor, you’ll add aromatics like fresh garlic and ginger, plus seasonings like soy sauce and sesame oil. Make sure to chop your vegetables as finely as you can—this ensures the filling is uniform and easy to wrap. Mix everything together in a bowl until it’s just combined. You don’t want to overwork it, as that can make the filling tough.
Step 2: Fold Your Gyoza
This is the fun, creative part! Don't worry about making them look perfect on your first try; just focus on getting a good seal. Start by placing about a tablespoon of filling in the center of a gyoza wrapper. Dip your finger in a small bowl of water and run it along the outer edge of the wrapper. This moisture acts as a glue to hold everything together. Fold the wrapper in half over the filling to create a half-moon shape. To get that classic gyoza look, create small pleats along one side, pressing each fold against the flat edge of the other side.
Step 3: Get a Perfect Seal
A tight seal is the secret to keeping all that delicious filling inside your gyoza while it cooks. As you fold and pleat, press the edges together firmly to squeeze out any air pockets. The water you added to the edge of the wrapper is essential here, so don't skip that step. Another key tip is to avoid overfilling your wrappers. It’s tempting to pack them full, but too much filling makes it nearly impossible to seal them properly and increases the chances they’ll burst open in the pan. A little less than a tablespoon is usually the perfect amount to work with.
How to Cook Your Chicken Gyoza
You’ve done the hard work of mixing, filling, and folding. Now it’s time for the final, most satisfying step: cooking your chicken gyoza. Getting that perfect texture—a crispy, golden-brown bottom with a tender, steamed top—is the goal, and it’s much easier to achieve than you might think. You don’t need any fancy equipment, just a good skillet with a lid. The secret lies in a simple two-part cooking process that combines pan-frying and steaming. This method ensures the filling is cooked through and juicy while the wrapper gets that irresistible crunch.
At Otaku Ramen, we've spent years perfecting our cooking methods to serve up happiness in every bite, and we want you to have that same experience at home. The beauty of gyoza is their versatility in the kitchen. Whether you’re cooking them fresh for dinner tonight or pulling a batch from the freezer for a quick meal, these techniques will help you get restaurant-quality results. We'll cover the classic pan-fry method that delivers that signature crispiness, and I'll share the best way to cook them from frozen so you can always have gyoza on hand. Ready to get that perfect sizzle?
The Classic Pan-Fry Method
This is the go-to method for a reason. It creates that perfect textural contrast that makes gyoza so addictive. Start by heating a bit of neutral oil in a non-stick skillet over medium-high heat. Arrange your gyoza in a single layer, flat-side down, and let them fry for 2-3 minutes until the bottoms are golden brown and crispy. Next, carefully pour in about a quarter cup of water—it will sizzle and steam immediately! Cover the pan with a lid and let the gyoza steam for another 3-5 minutes, or until the wrappers are translucent and the filling is cooked through. This classic gyoza recipe is a great guide for getting it just right.
The Pan-Fry and Steam Technique
Think of this as the one-two punch for perfect gyoza. You get the crispy bottom from the initial fry and the juicy, tender filling from the steam. The best part? You can achieve this with just a standard skillet, so there's no need for a special steamer. The key is to first pan-fry one side until it's beautifully crisp, then add a splash of water and quickly cover the pan. This traps the steam, which gently cooks the rest of the dumpling and the filling inside. This simple pan-fry and steam technique is what gives gyoza their signature texture that’s impossible to resist.
Cooking Gyoza Straight from the Freezer
One of the best things about making gyoza is that they freeze beautifully, making them the ultimate convenience food. When you’re ready to cook them, there’s no need to defrost. In fact, you shouldn't! Cooking them from frozen helps them keep their shape. Just follow the classic pan-fry method, but add an extra minute or two to the steaming time to ensure the filling is heated all the way through. This is a fantastic way to prep for a busy week—spend an afternoon folding, then enjoy a delicious, quick and easy meal whenever the craving strikes.
Common Gyoza Mistakes (And How to Avoid Them)
Making gyoza from scratch is incredibly rewarding, but a few common slip-ups can stand between you and dumpling perfection. Getting that crispy-bottomed, juicy-centered bite you love from our menu is easier than you think once you know what to look out for. We’ve all been there—wrappers that won’t seal, fillings that turn soggy, or dumplings that fall apart in the pan. Don’t worry, these issues are completely avoidable. By sidestepping a few key mistakes, you can make delicious, restaurant-quality gyoza right in your own kitchen. Let’s walk through the most frequent errors and exactly how to fix them so your next batch is your best one yet.
Don't Overfill Your Wrappers
It’s tempting to stuff your gyoza with as much delicious filling as possible, but this is where many first-timers go wrong. Overfilling makes it nearly impossible to get a tight seal, which can cause your dumplings to burst open while cooking. To avoid this, aim for about one teaspoon to three-quarters of a tablespoon of filling per wrapper. A good rule of thumb is to place a small dollop right in the center, leaving a clean border of about half an inch. This gives you plenty of room to pleat and press the edges together securely, ensuring all that juicy goodness stays inside the gyoza where it belongs.
Prep Your Cabbage the Right Way
Cabbage is a key ingredient in many gyoza fillings, but it holds a surprising amount of water. If you don't remove that excess moisture, it will release during cooking and turn your filling into a watery mess. This not only makes the gyoza wrappers soggy but also prevents them from getting that signature crispy, golden-brown bottom. The fix is simple: after finely chopping your cabbage, toss it with a bit of salt and let it sit for about 15 minutes. Then, use your hands or a clean kitchen towel to squeeze out as much liquid as you can. This extra step is a game-changer for achieving the perfect texture.
Keep Your Wrappers from Drying Out
Gyoza wrappers are thin and can dry out very quickly once exposed to air, making them brittle and prone to cracking when you try to fold them. Nothing is more frustrating than a wrapper that splits as you’re making your final pleat. To prevent this, work in small batches and keep the stack of wrappers you aren’t using covered with a damp paper towel or plastic wrap. This simple trick will keep them moist and pliable, making the folding process much smoother. If you end up with extra uncooked gyoza, they freeze beautifully. Just place them on a baking sheet in a single layer to freeze before transferring them to a freezer bag.
Pro Tips for Perfect Gyoza Texture
Getting that perfect gyoza texture—crispy on the bottom, tender on top, with a juicy, flavorful filling—is what makes them so irresistible. It might seem like a restaurant secret, but it really comes down to a few key techniques. Once you master these simple steps, you'll be making gyoza that rival your favorite ramen shop (maybe even ours!). These aren't just suggestions; they're the game-changers that will take your homemade dumplings from good to absolutely unforgettable. Let's get into the details that make all the difference.
Salt and Squeeze Your Veggies
This might be the single most important tip for avoiding sad, soggy gyoza. Cabbage is full of water, and if you don't deal with it beforehand, it will turn your perfect filling into a watery mess inside the wrapper. The fix is easy: after you finely chop your cabbage, toss it with a bit of salt and let it sit for about 15 minutes. The salt will draw out the excess moisture. Then, grab handfuls of the cabbage and squeeze as hard as you can to get every last drop of water out. This simple trick ensures your filling stays flavorful and your gyoza wrappers remain delightfully chewy, not mushy.
Knead the Filling for a Bouncier Bite
Have you ever wondered how restaurant gyoza have such a cohesive, springy filling? The secret is in the kneading. When you mix your ground chicken and seasonings, don't just stir—get in there with your hands and knead the mixture until it becomes sticky and pale. This process isn't just for combining ingredients; it actually develops the proteins in the meat, helping everything bind together beautifully. This creates a bouncier, more pleasant texture in the final cooked dumpling and prevents the filling from being crumbly. It’s a small step that makes a huge difference in the mouthfeel of your gyoza.
Nail Your Cooking Time
The magic of a perfect gyoza lies in its dual texture, and that comes from a specific cooking process. The best way to achieve this is the classic pan-fry and steam method. Start by searing the bottoms of your gyoza in a hot, oiled pan until they're golden brown and crispy. Then, carefully pour a few tablespoons of water into the pan and immediately cover it with a tight-fitting lid. The water will create steam, which gently cooks the rest of the wrapper and the filling. Once the water has evaporated, your gyoza are done. This technique gives you that signature crispy bottom with a tender, steamed top every single time.
Don't Forget the Dipping Sauce
Let’s be honest: a perfectly cooked gyoza is only half the story. The other half is the delicious sauce you dip it into. A great dipping sauce doesn't just add flavor; it complements the savory filling and crispy wrapper, creating that perfect, satisfying bite. Think of it as the ultimate sidekick to your gyoza hero. While our gyoza at Otaku Ramen are tasty enough to stand on their own, we know that a fantastic sauce can make the experience even better.
The beauty of gyoza sauce is its simplicity and versatility. You can whip up a classic version in seconds, add a little heat for a spicy kick, or get creative and invent a signature sauce that’s all your own. We’ll walk through a few of our favorite approaches, starting with the timeless classic that you’ll find in ramen shops and homes all across Japan. Get your little sauce dishes ready!
The Classic Soy-Vinegar Dip
If you’re looking for the most traditional and straightforward gyoza sauce, this is it. The classic soy-vinegar dip is all about balance. It combines the salty, umami depth of soy sauce with the bright tang of rice vinegar. This simple pairing cuts through the richness of the chicken filling and cleanses your palate, getting you ready for the next bite. For a perfect starting point, mix equal parts soy sauce and rice vinegar. From there, you can add a few drops of sesame oil for a nutty aroma or some finely grated ginger for a touch of warmth. It’s a classic combination for a reason—it just works.
Spicy Chili Oil Variations
For those who enjoy a little heat, adding chili oil is the easiest way to spice things up. A drizzle of la-yu, or Japanese chili oil, into your soy-vinegar base adds a warm, toasty heat that builds with every dip. But you don't have to stop there. You can create even more complex flavors by adding a small amount of miso paste for a deeper umami flavor or a tiny bit of yuzu kosho for a bright, peppery, and citrusy kick. Using ponzu (a citrus-based soy sauce) as your base instead of regular soy sauce is another great way to introduce a different kind of acidity that pairs beautifully with spice.
Get Creative with Your Own Sauce
This is where you can really have some fun. Think of the classic soy-vinegar dip as your canvas and start experimenting. There are no strict rules when it comes to creating your own sauce. A great way to start is by following a simple formula: one part salty (like soy sauce), one part tangy (like rice wine vinegar), and an aromatic element (like minced garlic or sesame oil). Want it a little sweeter? Add a pinch of sugar. Want more freshness? Toss in some finely chopped scallions. The key is to taste as you go and adjust until you find a balance you love. This is your chance to create a sauce that’s perfectly tailored to your taste.
Ready to Experiment? Gyoza Variations to Try
Once you’ve mastered the classic chicken gyoza, you can start having some real fun in the kitchen. The beauty of gyoza is its versatility. Think of the wrapper as a blank canvas for all your favorite flavors. From traditional Japanese variations to creative fusion fillings, there are endless ways to make this recipe your own. Trying new combinations is part of what makes cooking so rewarding, and it’s a great way to discover your signature gyoza style. So, roll up your sleeves and get ready to play with your food.
Traditional Japanese Twists
While gyoza has Chinese origins, Japan has wholeheartedly adopted and adapted it. Different regions have put their own spin on the dish, leading to some delicious local specialties. For example, some cities are famous for their gyoza, featuring unique fillings or cooking styles that have been passed down for generations. You can bring this spirit into your own kitchen by making small tweaks. Try adding a bit more garlic for a punchier flavor, or use nira chives instead of green onions for a more authentic taste. Exploring these subtle changes is a great way to connect with Japan's rich gyoza culture and find the flavor profile you love most.
Fun Fusion Filling Ideas
Don’t be afraid to step outside of traditional boundaries with your fillings. After all, creativity is at the heart of great food. Start by thinking about flavors you already love. If you’re a fan of spicy food, add some finely minced jalapeño or a dash of sriracha to your chicken mixture. For a creamier, richer bite, try adding a little cream cheese or shredded mozzarella. You can also experiment with different proteins like shrimp or ground turkey, or go completely vegetarian with a mix of shiitake mushrooms, tofu, and edamame. The possibilities are endless, so let your taste buds lead the way. For inspiration, check out the flavor combinations on our Otaku Ramen menu.
Other Ways to Cook Your Gyoza
The classic pan-fry and steam method is fantastic, but it’s not the only way to cook gyoza. Changing your cooking technique can completely transform the texture and experience of your dumplings. For a softer, chewier gyoza, try boiling them (sui-gyoza), which is perfect for adding to a light broth or soup. If you’re craving something extra crispy, deep-frying (age-gyoza) is the way to go. These golden-brown parcels are a crowd-pleasing appetizer, especially when served with a variety of dipping sauces. Each method of cooking offers a different result, so it’s worth trying them all to see which one you prefer.
How to Store and Freeze Your Gyoza
Making a big batch of gyoza is always a good idea, whether you're planning for future meals or just have some delicious leftovers. Proper storage is key to making sure they taste just as good the second time around. Here’s how to keep your gyoza fresh, whether they’re cooked or uncooked, so you can enjoy them whenever the craving strikes. It's all about locking in that flavor and texture for later.
Storing Cooked Gyoza
So you’ve finished your meal and have a few perfect, pan-fried gyoza left over. Lucky you! To keep them tasting great, let them cool down to room temperature first. Then, arrange them in a single layer in an airtight container. This is the most important step—it keeps them from getting soggy and prevents them from absorbing any other flavors from your fridge. They’ll stay fresh and delicious for up to three days, making them perfect for a quick lunch or snack. Of course, if you find your container empty sooner than expected, you can always order a fresh batch from us.
Freezing Uncooked Gyoza for Later
If you're in a meal-prep mood, making a large batch of gyoza to freeze is a brilliant move for your future self. To do it right, place your freshly folded, uncooked gyoza on a baking sheet lined with parchment paper. Make sure they aren't touching, then slide the sheet into the freezer for a couple of hours. This flash-freezing method is the secret to preventing them from sticking together in one big clump. Once they're frozen solid, you can transfer them to a freezer bag, squeeze out the air, and they’ll keep well for up to a month. When you're ready to eat, cook them straight from the freezer—just add a little extra water to the pan and steam them for two extra minutes.
The Best Way to Reheat Them
When you’re ready to enjoy your leftover cooked gyoza, you want to bring them back to life without drying them out. The quickest and easiest way is using the microwave. Place the gyoza on a plate, cover them with a damp paper towel, and heat them for about a minute. The steam from the paper towel gently reheats the dumplings, keeping the filling juicy and the wrapper soft. If you want to revive that crispy bottom, you can also pan-fry them for a minute or two with a tiny bit of oil after they're warmed through. It’s a simple trick that works wonders and is the next best thing to enjoying them straight from the pan at one of our Nashville locations.
How to Serve Your Homemade Gyoza
You’ve done the hard work of mixing, folding, and pan-frying your gyoza to perfection. Now for the fun part: serving them! Presentation is key to making your homemade meal feel like a special occasion. Gyoza are incredibly versatile; they can be the star of the show as a main course, a tasty appetizer before a big bowl of ramen, or part of a larger spread of Japanese-inspired dishes.
At our restaurants, we love seeing a plate of crispy gyoza arrive at the table just before the ramen. It sets the stage for the main event. You can create that same experience at home. Think about how you want to enjoy them. Are they a quick and satisfying snack? A shared appetizer for a dinner party? Or the perfect partner to another dish? Deciding on their role will help you plate them like a pro and choose the perfect accompaniments to complete your meal.
Plating and Presentation Tips
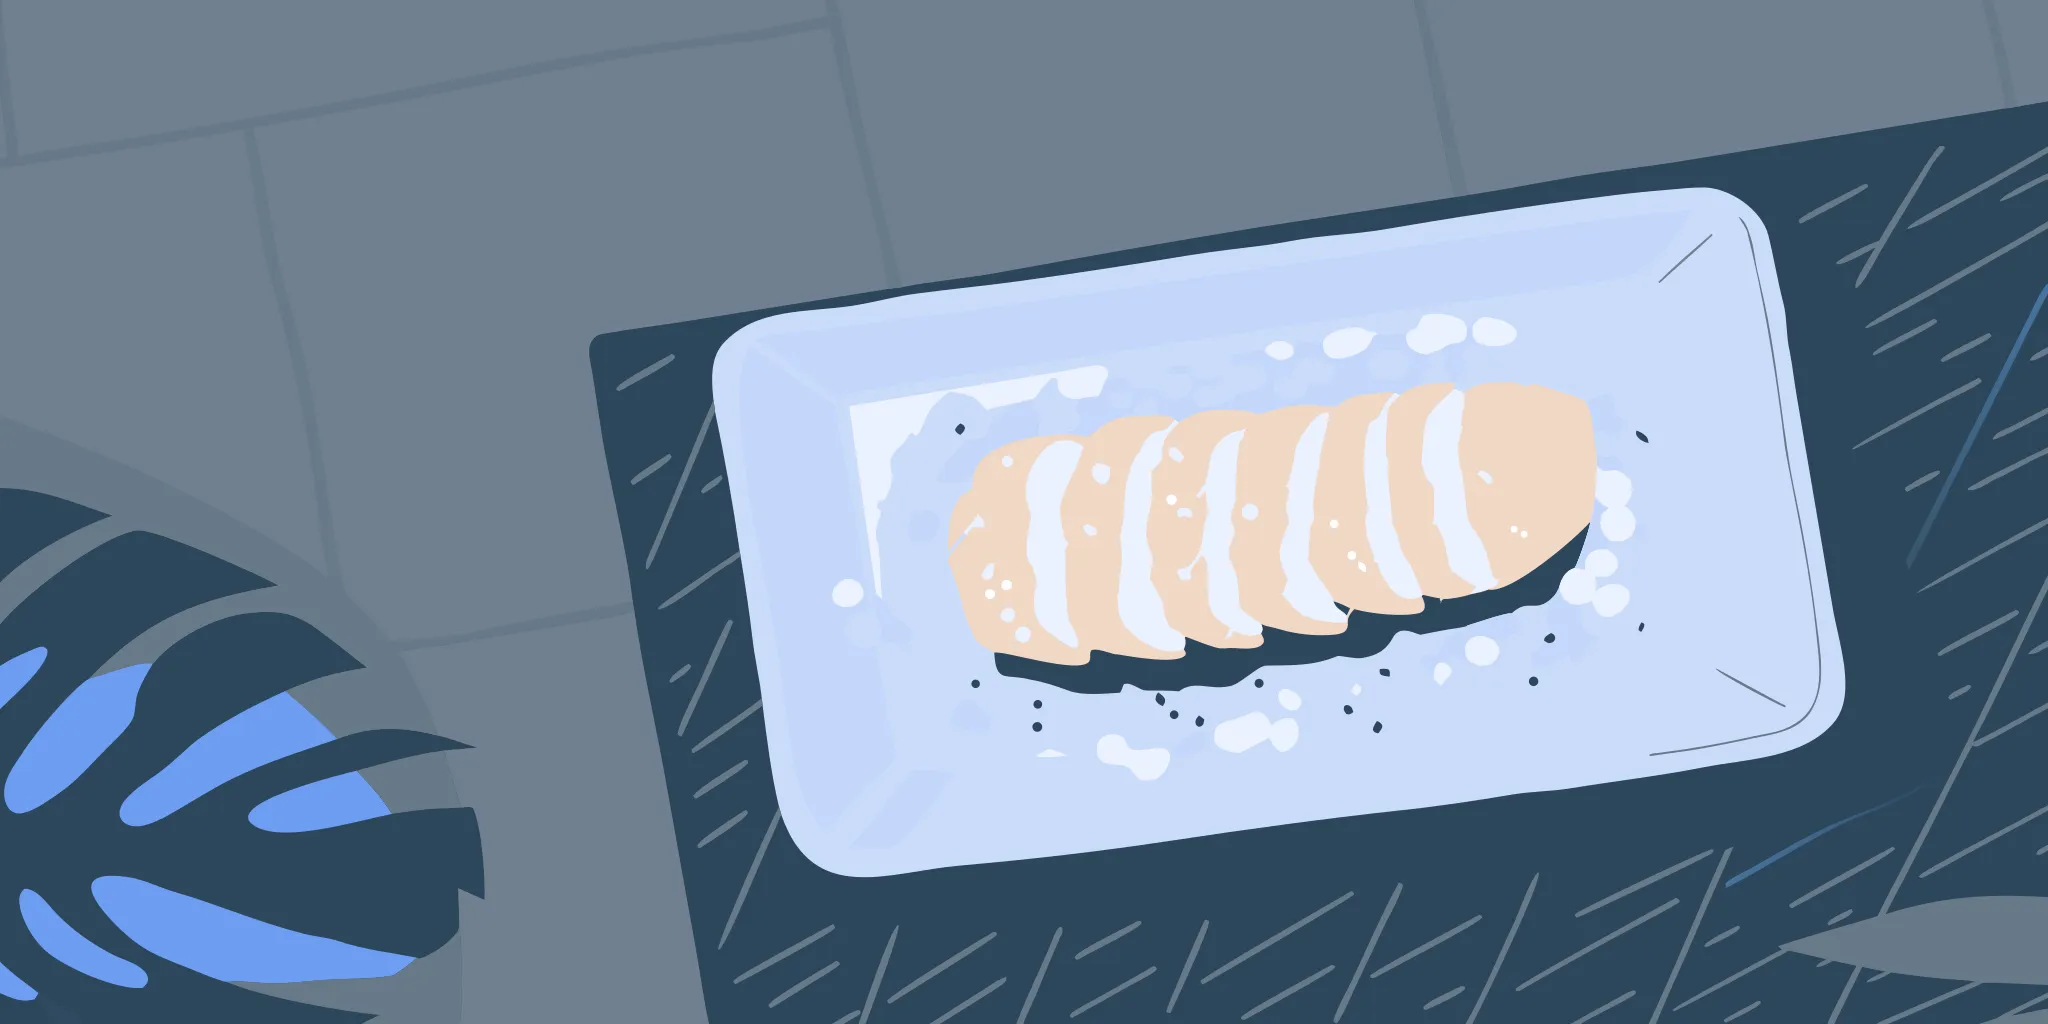
The classic way to serve pan-fried gyoza is with the crispy, golden-brown bottoms facing up. This showcases your perfect cooking technique and keeps them from getting soggy. Arrange them in a single layer on a plate, either in a straight line or a decorative circle. A simple, clean plate—round or rectangular—works best to let the gyoza shine.
For a finishing touch, you can garnish with thinly sliced scallions or a sprinkle of toasted sesame seeds for extra texture and flavor. Don’t forget a small dish for your dipping sauce on the side. This simple presentation looks elegant and inviting, turning your delicious dumplings into a feast for the eyes.
Perfect Side Dish Pairings
Gyoza are fantastic on their own, but they truly come alive when paired with the right side dishes. The most classic pairing, of course, is a steaming bowl of ramen. The savory dumplings are the perfect complement to the rich broth and noodles you’ll find on our menu. You can also serve them with a simple bowl of steamed white rice to soak up all that delicious dipping sauce.
For a lighter meal, a crisp cucumber salad or some blanched spinach with sesame dressing adds a refreshing contrast. If you’re creating a bigger spread for friends or family, consider adding other popular dishes like Japanese fried chicken (karaage) or edamame. Creating a few different dishes to share, izakaya-style, makes for a fun and memorable dining experience right at home.
Related Articles
- Chicken Gyoza | Otaku Ramen
- Vegetable Gyoza | Otaku Ramen
- How to Make Karaage Chicken (The Right Way) | Otaku Ramen
- How to Make Delicious Pork Bao Buns from Scratch | Otaku Ramen
- One-Pan Chicken Teriyaki with Rice & Broccoli: Easy Recipe | Otaku Ramen
Frequently Asked Questions
What if I can't find gyoza wrappers at my store? Don't worry, you can absolutely use wonton wrappers as a substitute. You can usually find them in the same refrigerated section. Since they are often square, you can use a round cookie cutter or the rim of a glass to cut them into circles for that classic gyoza shape. Just remember to keep the stack covered with a damp cloth while you work so they stay pliable.
My gyoza keep sticking to the pan. What am I doing wrong? This is a common problem that usually comes down to two things: your pan or your heat. A good non-stick skillet is your best friend for making gyoza. Also, make sure your pan and oil are properly heated before you add the dumplings. This creates an immediate sear that helps prevent them from sticking. If they still give you trouble after steaming, let them rest in the pan off the heat for a minute; they often release on their own as they cool slightly.
Is it better to freeze gyoza before or after cooking them? For the best texture and flavor, you should always freeze your gyoza uncooked. After you’ve folded them, place them on a parchment-lined baking sheet in a single layer so they aren't touching. Once they are frozen solid, you can transfer them to a freezer bag. This keeps them from sticking together and allows you to cook them straight from the freezer for a quick and delicious meal.
Why does the filling in my gyoza seem watery? A watery filling is almost always caused by moisture from the vegetables, especially cabbage. To fix this, you need to salt and squeeze your finely chopped cabbage before mixing it into the filling. Tossing it with a little salt and letting it sit for about 15 minutes will draw out the excess water. Then, squeeze it out with your hands or a clean kitchen towel. This extra step is a game-changer for achieving a perfect, juicy filling instead of a soggy one.
How many gyoza should I make per person? If you're serving gyoza as an appetizer before a main course like a big bowl of ramen, planning for four to six pieces per person is a great start. If the gyoza are the main event for dinner, you’ll want to aim for about ten to twelve per person, especially if you serve them with some steamed rice and a simple side salad.